


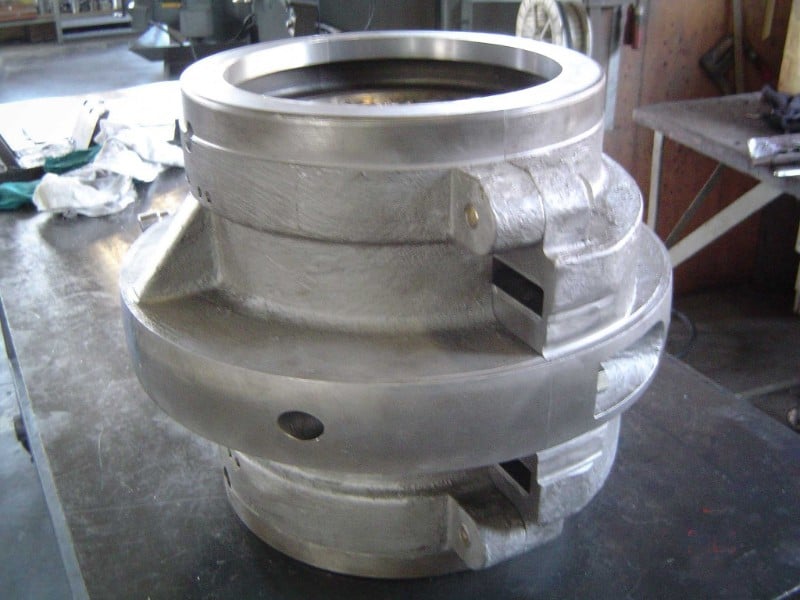
Babbitt bearings are found in pumps, motors, fans, industrial equipment, and turbines. Basically, they support the weight of the shaft and provide a non-damaging surface to the high-speed shaft that rotates. The lining of a bearing is bonded with Babbitt, which is a soft alloy featuring a low-melting point. When contamination occurs or failure happens in the lubrication system, the softer alloy wears out instead of the shaft.
Babbitt bearings are used for oil-lubricated systems and feature different designs. These are based on the shaft speed and stability, bearing load and cooling, plus the alignment, and electrical requirements. It’s possible to fit a Babbitt bearing with temperature and vibration sensors or water-cool them as necessary.
Overall, Babbitt bearings require minimal maintenance and run for a long time without any attention. Not only do they support mechanical parts, but they also protect against frictional degradation. The more powerful and heavy that an engine is, the stronger your bearings must be. If you plan to restore an antique car, you might find that you’ll need Babbitt bearings to complete your task. We’ve got the steps you need to get the job done right.
History of the Babbitt Bearing
Isaac Babbitt created the Babbitt metal in 1839. He was born in Taunton, Massachusetts on July 26, 1799. This soft, non-ferrous, white alloy later became used to produce the bearing surface. Its properties helped reduce friction.
Babbitt was known as an inventor and quickly received his patent for this new alloy. The original formula included 89.3% tin plus 7.1% antimony and another 3.6% copper. That formula exists to this day and is known as Genuine Babbitt or ASTM B-23 Grade 2 Babbitt.
At first glance, it doesn’t seem that the Babbitt material would make a good bearing. That’s because it gets easily damaged and is soft. Appearances are deceptive because the overall structure of this alloy constructed of smaller hard crystals. As the bearing begins to wear down, this solid crystal becomes exposed. It also provides the pathway for a lubricant to travel between the higher spots.

How a Babbitt Bearing Works
Surprisingly, the mechanics of a Babbitt bearing are simple. For any bearing to operate properly, it must create low friction. The less resistance on a rotating object, the easier it turns.
With a Babbitt bearing, this low friction is caused two ways. First, the material of the Babbitt provides less resistance to begin with. Even when it’s not lubricated, there is less friction when compared to cast iron or steel.
Once the lubrication is added, these bearings retain a very low instance of friction; much less than many other ball bearings.
Of course, for this to be true, the bearings must receive the proper amount of lubrication. Ideally, the rotating shaft over top of the Babbitt alloy draws in the oil and creates a thin film of materials to keep it lubricated.
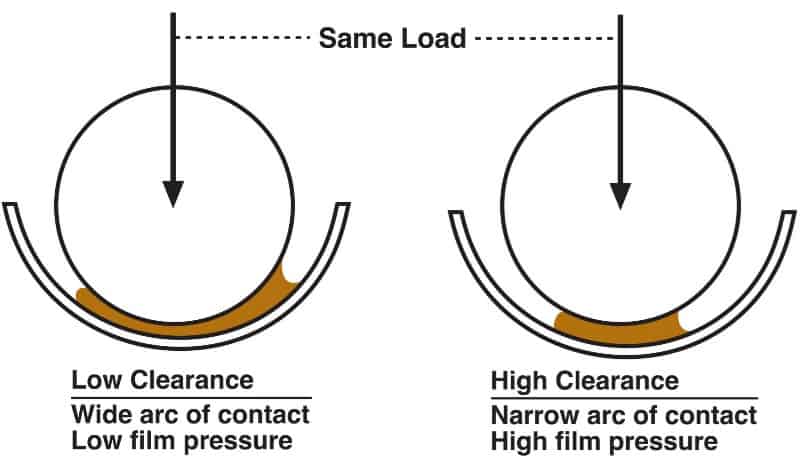
For example, as the shaft remains still, its load makes contact with the Babbitt surface. Because there is oil inside the bearing, the shaft is surrounded at every contact point. When the shaft turns, oil from the surrounding area is pulled in under the shaft. This creates a wedge-shaped oil film. In ideal circumstances, the shaft floats on the oil film and never touches the bearing material at all.
If enough oil isn’t present, or it breaks down because of poor viscosity, insufficient speed, an excessive load or insufficient oil, then the bearing will likely become warm, but typically won’t lead to massive problems.
Types of Babbitt


Selecting the Best Babbitt Material
To determine what bearing material you want for a specific application, you’ll want to follow these guidelines.
Calculate the Surface Speed
The shaft’s surface speed is defined by how many feet are traveled circumferentially per minute from the shaft. You’ll need to use this formula to find the value:
Surface Speed = Pi x D x RPM / 12
Pi is 3.1416 and “D” stands for the shaft diameter measured in inches. You multiply that by the revolutions per minute divided by 12.
Calculate the Bearing Load
On older woodworking machines, the bearing load isn’t the main concern. That’s because the weight to surface area ratio isn’t large enough to cause any difference. The load only comes into play when you use heavy shafts for long periods of time. A good example of this is with an in-line shaft machine. This leaves excessive weight over small bearings.
To determine the bearing load, you’ll use this formula: W / ID x L
“W” stands for the weight by pounds. This needs to be the total weight on the bearing including cutter heads, pulleys, and shafts. “ID” stands for the diameter internally of the bearing by inches. Finally, the “L” stands for the bearing length in inches.
Determine the Materials Needed
Lead-based Babbitt ranges in composition from 10-15% antimony. In addition, they contain a maximum of 10% tin while the rest of the structure relies on lead. This composition is less costly and typically softer than the tin-based variety. Because of this, there’s less chance to score the shaft.
On the other side, the lead-based Babbitt doesn’t hold up well under a great load or during high speeds. They are geared more toward lighter-duty, lower-speed applications. You might find them used commonly on a band saw arbor.
Tin-based Babbitt, on the other hand, is constructed of 80-90% tin. The rest is made from 3-8% copper and 4-14% antimony. Any increase in the antimony or copper adds more strength and hardness to the composition while decreasing ductility. Doing this increases the chance of fatigue and cracking.
The tin-based variety works best on higher-speed applications like planers and jointers. They also are ideal for any bearing that’s difficult to lubricate. The cost for the tin is much higher than lead, but it’s often money that is well spent in the long run.
Recycling Babbitt
If you’re considering pouring your own Babbitt bearings, then it would help to know how to recycle the materials. You can reclaim old Babbitt, but there’s often not enough in old shells to pour a new bearing. To save money, some people look to mixing the old composition with a new one. We don’t recommend this avenue.
Because you don’t know the precise measurements in your composition, you’ll make an alloy that doesn’t perform as it should. You may not even know if your current bearing is tin or lead-based. If you mix a lead and a tin-based bearing together, what you’re left with is a spongy bearing instead. That only leads to premature failure and wastes your time.
Instead, it’s wise to take any used Babbitt bearing to your local recycler for proper disposal.
Steps to Pouring Your Babbitt Bearing

Step #1 – Remove Old Bearing
Prior to doing anything else, you want to remove your old bearing. Because they are solid, you’ll need to melt them off with an oxy-acetylene torch. If you don’t have one, they are easy to find at a building supply or hardware store.
As you heat the bearing, make sure to melt the retaining grooves as well as the holes. Then, collect the Babbitt in your cast iron melting pot. If you don’t have one yet, you’ll want to pick that up at your local welding supply store.
Step #2 – Purchase Your Babbitt
As we previously talked about, you never want to reuse your existing Babbitt. The impurities change the composition and you don’t know exactly what’s inside. That’s why you want to follow the guide above to determine what type of Babbitt works best for you.
Then, head to your local chipper or sawmill supply companies to purchase the materials needed. Some hardware stores also carry what you’ll need. Otherwise, shop at places online such as Kapp Alloy.
Step #3 – Prepare Your Surfaces
Prior to moving any further, you must prepare all of the surfaces. Typically, you’ll want to use a solvent that removes the entire residue from contaminants and oil. Oftentimes, this is the most difficult part of the whole process, especially on older and worn-out surfaces.
Over time, contaminants and lubricants make their way deep into the old bearing and steel. Even when you think it’s clean, you’ll heat it back up and find that more oil and contaminants come from your steel. Heat the area and then scrub with a stainless steel brush. This is a great addition to using your solvent treatment. You never can be too sure that everything’s removed because contaminants will stop your Babbitt from bonding properly.
Once the shaft is clean and ready to hold the bearing, you are prepared to move on.
Step #4 – Coat the Shaft
You need to coat the shaft in order to prevent the bearing from sticking to it. To do this, you simply use some smoke from a candle or lower-flame kerosene lamp.
Step #5 – Position Your Parts
Put the bearing shell into a vertical position. Then, align your shaft in the middle of the bearing shell. You want to ensure that it’s completely lined up in the middle. There’s no room for error.
Your next task is to dam or plug the holes within the bearing, other than of course, your fill hole. Commonly used materials include clay, sheet metal, fireproof pasteboard, or wood.
Step #6 – Melt the Metal
Using your cast iron melting pot from earlier, heat up the new Babbitt metal to your desired temperature. This depends on the alloy you’re using. If you use an electric lead pot, you’ll have more control over the heat.
You can find melters at armory supply shops or specialty forging shops. This is also a great place to find the bullet caster thermometer which helps check the temperature of your metal.
Step #7 – Heat the Shaft and Bearing Shell
This minimizes thermal shock when you pour the bearing material into the shell. It also helps to provide a consistent bearing for longer life. Try to heat your shaft and bearing shell to 250 degrees Fahrenheit. This is an ideal temperature to ensure the moisture evaporates quickly without sputtering.
Step #8 – Skim the Babbitt Metal
Once your Babbitt metal reaches the right temperature, you’ll want to stir it completely. Then, skim off the impurities, otherwise known as dross. You’ll find that they float to the top of your metal and are easy to spot.
Step #9 – Pour Your Bearing
Once everything is ready to go, pour your molten metal into the shell. If you don’t have a large enough ladle to get it all in within one pour, then you want to get the second one in as quickly as possible. Otherwise, you might face a boundary between the two that degrades the durability.
Step #10 – Finish
Once the bearing is completely cooled off, you’ll use your drill to make the oil holes. Then, clean off the excess material after drilling.
Take a diamond-shaped chisel and work out an oil groove from your oil holes. This should measure about ¼-inch from the end of your bearing. Your oiling groove must be cut down the inside surface of your bearing to release it from the shaft. This allows it to be replaced once chiseling is complete. Once the entire job is done, make sure you clean up any leftover residue and put away your tools.
That’s it! You now have a fully functional Babbitt Bearing to protect your machinery and engines from wear.
Final Thoughts
If you have the need for a Babbitt bearing, making them isn’t so hard to do. Anyone mechanically inclined will be able to produce a functional Babbitt bearing for their machinery without any professional experience. Most of the supplies should be available locally, so you also shouldn’t have any trouble finding what you need.
Have you ever made any Babbitt bearings? We would love to hear about your experience.

